


You expect dust in a room being renovated.
But what about your kitchen cupboards, the hallway your children use, or the bedroom you still need to sleep in?
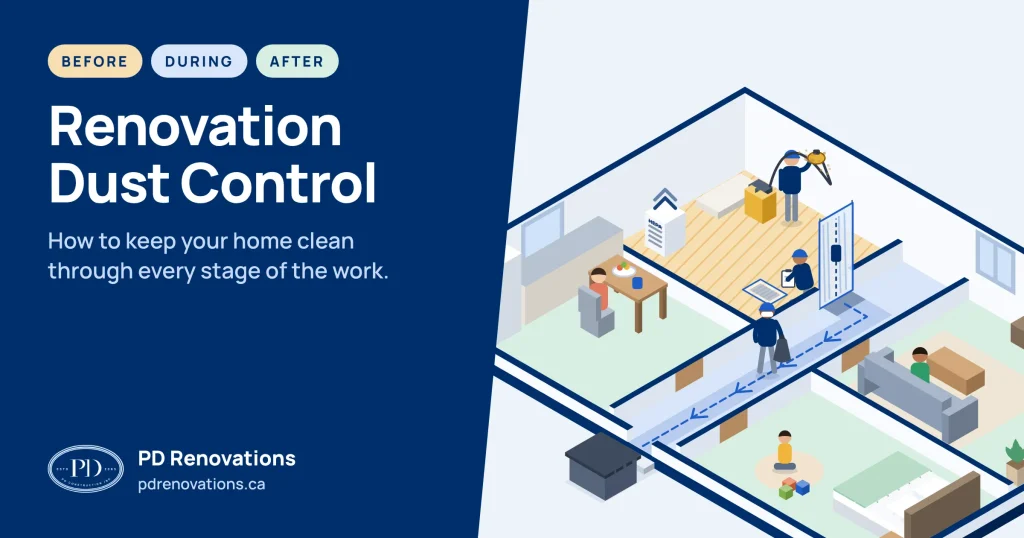
Renovation dust control starts before demolition. Agree on work-area separation, dust capture and daily cleanup with your contractor.
Plan suitable HEPA vacuuming and damp cleaning after the work. These steps reduce dust and its spread; they cannot promise a dust-free home. [1]
What should you move, what should your contractor clean, and what changes if someone has allergies or asthma? Here’s what to settle before, during and after renovation.
Why renovation dust reaches rooms outside the work area
Cutting timber creates sawdust. Sanding joint compound creates drywall dust, while work on concrete, masonry and some other materials can release respirable crystalline silica, a lung hazard that needs task-specific controls. [2]
Dust can travel through open doorways and air pathways. Workers can also carry it beyond the work area on footwear, clothing and equipment.
A closed bedroom door helps limit access, but it does not resolve every route through the house. Ask your contractor to consider hallways, stairwells and shared heating or cooling systems when planning separation.
Some fine particles are too small to see without a microscope. A room can look clean while particles remain in the air, so visible cleanliness alone cannot confirm safe exposure levels. [3]
Before renovation: prepare your home and agree on the plan
Start with the rooms you need to keep using. Mark the work area, sleeping spaces, bathroom access and the route for workers and waste on a simple floor plan.
Check suspect materials before anyone disturbs them
Tell your contractor about old insulation, textured ceilings, previous leaks and any existing material-testing reports. Ask whether the planned work needs a hazardous-material assessment.
Suspected asbestos or lead-based paint needs professional assessment before disturbance. Do not sand, scrape, sample or vacuum suspect material yourself; a building’s age cannot confirm what a particular material contains. [4, 5]
If demolition exposes unexpected suspect material, pause work in that area and keep people out while a qualified professional assesses it. For extensive or recurring mould, seek professional help and address the moisture source before closing the wall. [6]
Remove belongings and protect what stays
Before the crew arrives:
· Move bedding, curtains, rugs, toys and loose clothing out of affected rooms.
· Store electronics, books and small appliances away from the work route.
· Empty cabinets that workers will remove, modify or need to access.
· Ask how the crew will cover furniture that cannot move.
· Agree on floor protection and tape that suit your existing finishes.
· Photograph floors, countertops and furniture before work begins.
Ask who will maintain the protection as trades come and go. A covering that shifts underfoot or exposes a finished surface needs attention during the project.
Set up food and bathroom access
For a kitchen renovation, decide where you will prepare food, store dishes and wash utensils before demolition starts. Keep those activities outside the work area.
Put food, pet bowls, toothbrushes, towels and personal-care items in protected storage. Plan a usable bathroom route during a bathroom renovation so family members do not need to cross active work.
For an apartment or condo, involve building management in decisions about shared corridors, ventilation and debris routes. Your contractor should confirm the building’s requirements before setting up equipment or moving waste.
Agree on who cleans what
Ask for a written list of tasks. Contractors and cleaners may use “post-construction cleaning” to describe different levels of work.
Cleaning stage | Tasks to define in writing |
Daily housekeeping | Work-zone dust, access routes, loose waste and barrier checks |
Debris removal | Loading, hauling, disposal fees and special waste arrangements |
Completion cleaning | Floors, fittings and exposed surfaces within the renovation |
Detailed residential cleaning | Cabinet interiors, window tracks, adjacent rooms and affected furnishings |
These tasks need to be agreed with your provider; they are not automatic contract inclusions.
For post-construction cleanup, specify the rooms, surfaces, provider and timing. Agree on extra charges and how you will report missed areas.
For example, “clean the kitchen” leaves room for disagreement. “Clean cabinet interiors, drawer bases, countertops, window tracks and the kitchen floor” gives both sides something concrete to check.
During renovation: control dust where the work happens
Ask how the crew will capture dust, separate the work area and maintain protection as different trades come and go.
“Seal off the work area to reduce the movement of dust and fumes from the project into other parts of the house.”
Health Canada [1]
Understand what each control does
Several measures can work together, but each has a different job. [2, 3, 7]
Measure | What it helps with | What to confirm |
Extraction attached to a tool | Captures dust near the cutting or sanding point | Suitability for the tool, material and task |
Dust barriers and controlled entry | Limits movement between work and living areas | Sealed gaps, access rules and barrier checks |
Air filtration | Removes some particles already airborne | Room capacity, placement and filter maintenance |
Daily housekeeping | Removes accumulated dust and debris | Method, timing, work route and named responsibility |
For dust containment, ask whether the setup needs plastic sheeting, sealed openings and a zipper door.
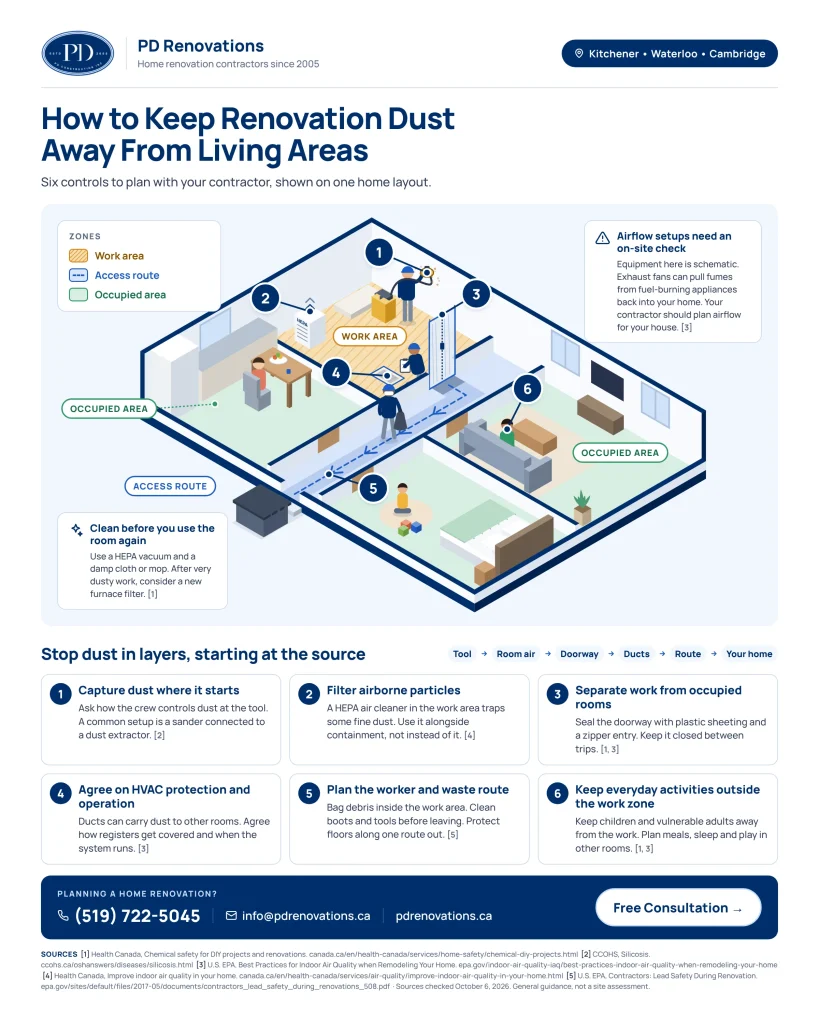
Keep that entrance closed between trips, and leave equipment adjustments to the crew.
Plan HVAC operation and airflow together
Your HVAC system, meaning heating, ventilation and air conditioning, needs a project-specific plan. Ask your contractor and, where needed, an HVAC professional how they will protect work-area supplies, returns and equipment while maintaining suitable conditions in occupied rooms.
Avoid making your own changes to vents or system operation. In cold weather, heating needs can affect whether the household can remain at home during dusty stages.
If the contractor proposes negative pressure, ask how they will manage it. This means arranging airflow into the work area to help limit dust escape.
Exhaust equipment can affect fuel-burning appliances and pull combustion gases back indoors. Its placement also needs to account for neighbours, outdoor conditions and where discharged air goes. [7]
Before opening windows, check outdoor air quality, weather and security. Outdoor pollution can make natural ventilation less helpful. [8]
Agree on an end-of-day routine
Ask the crew to include these checks in the work plan:
· Contain construction debris before moving it through occupied areas.
· Keep the agreed access route clear of loose material.
· Remove accumulated dust with methods suited to the material.
· Check dust barriers, floor coverings and equipment.
· Tell you when the next dusty stage will happen.
Avoid dry sweeping or compressed-air cleaning that sends dust back into the air. Ask the crew to use housekeeping methods suited to the dust and task. [9]
If dust reaches your living area, photograph the location and contact the site lead. Ask them to check the source and containment before work continues in the same way.
Renovating when someone has allergies or asthma
Plan around the person and the work schedule
Tell your contractor which household members react to dust, scented products or fumes. Include chemical sensitivity and any previous renovation-related symptoms in the discussion.
Asthma triggers vary between people. Chemical fumes and scented cleaning products can trigger symptoms alongside allergic triggers such as mould and dust mites. [10]
Ask for a schedule of demolition, sanding and coating work. You can then discuss temporary accommodation or time away during those stages with your healthcare professional.
Useful questions include:
· Does this work make staying at home unsuitable for me or my child?
· What changes in symptoms should make us leave and seek help?
· Does my asthma action plan need review before work starts?
· What should guide our return after cleanup?
Keep prescribed medication accessible and follow your existing care plan. A contractor can explain the work and controls; your healthcare professional can advise on your individual health needs.
Protect a sleeping and living area away from the work. Keep children and pets outside active work zones, and avoid asking a dust-sensitive family member to handle cleanup.
Asthma Canada recommends planning time away during peak dust and fume exposure. A portable air cleaner cannot establish that staying home is suitable for a particular person. [11]
Separate dust control from fume control
For cleaning products, consider a fragrance-free cleaner compatible with the surface. A low-odour cleaner may still contain ingredients that trigger symptoms, so discuss known sensitivities and check the product information.
Paints, adhesives and finishes can release gases, which need attention alongside dust.
“Air cleaners can be effective in removing particles but most do not remove gases.”
Health Canada [12]
Ask how product selection and ventilation will address fumes.
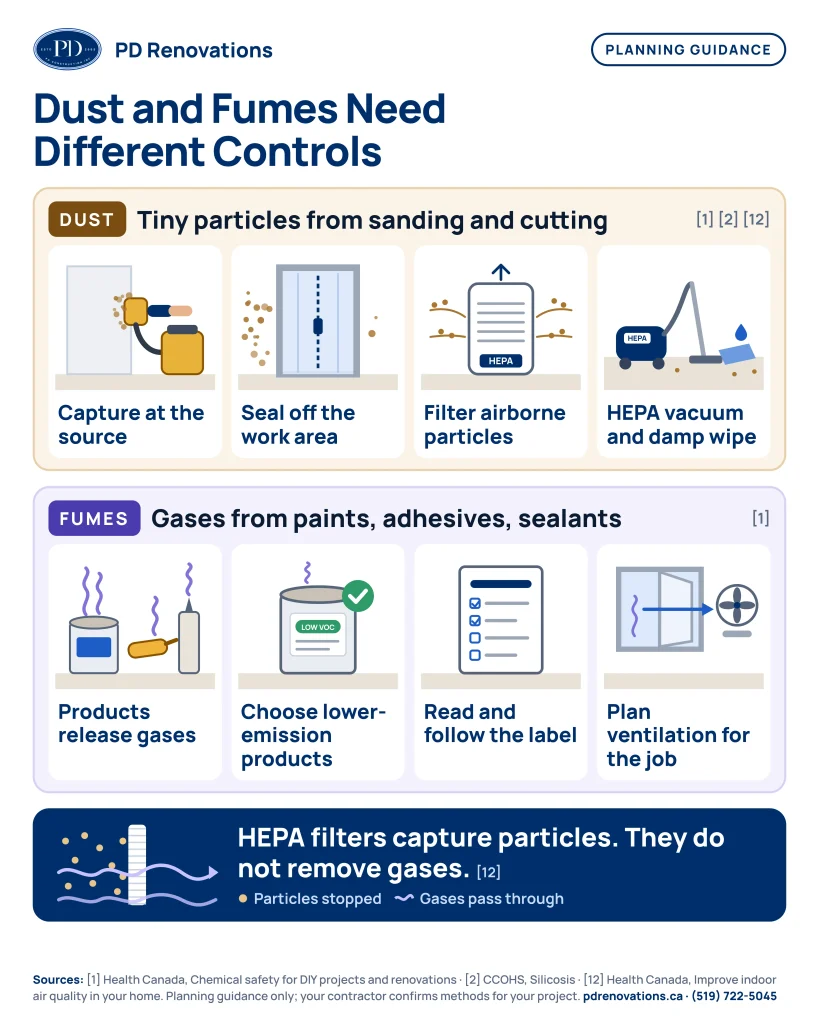
Health Canada also advises against ozone generators in homes. [12]
After renovation: how to clean up dust
Use this sequence for routine residual dust only after the contractor has identified the materials and resolved any hazardous-contamination concerns. Suspected asbestos or lead contamination needs specialist handling. [4, 5]
Book detailed post-renovation cleaning after dust-producing work ends. Ask when new paint, grout, sealants and flooring can tolerate cleaning, since product instructions vary.
1. Have the crew remove debris and manage protective coverings
Confirm who removes offcuts, packaging, fasteners and other construction debris. Leave sharp, heavy and unidentified waste to the crew or an appropriate service.
Ask the contractor when and how they will remove protective coverings without spreading collected dust. Follow local disposal requirements rather than assuming every material belongs in household waste.
2. Confirm the vacuum suits the dust
A HEPA vacuum uses high-efficiency particulate air filtration. Check that the complete machine suits the dust and uses the correct filters, bags and accessories.
A HEPA filter fitted into an ordinary vacuum does not automatically make the whole machine suitably sealed. Check the complete vacuum’s specifications, not just the filter label. [13]
Do not use a household vacuum for unidentified construction dust. If you cannot confirm the material or equipment suitability, ask the contractor to arrange the cleanup.
3. Work from high surfaces to low surfaces
Use high-to-low cleaning so dirt from ledges does not fall onto floors you have already finished. [14]
For reachable surfaces, check:
· Tops of doors, cabinets and shelving.
· Light fittings that you can safely access and clean according to their instructions.
· Window frames, tracks and sills.
· Trim, baseboards and exposed ledges.
· Cabinet interiors, drawers and hinges.
Remove loose dust with suitable equipment, then damp-wipe compatible hard surfaces. [1]
Use a clean microfibre cloth.
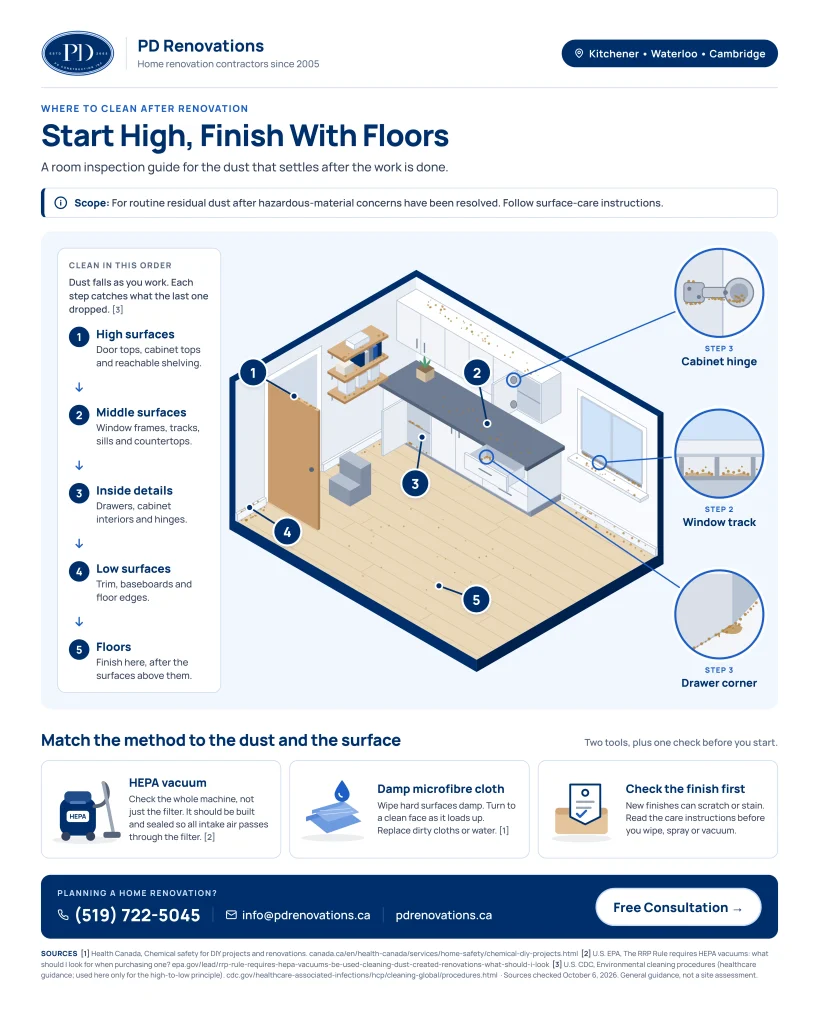
Turn to a clean face as it collects residue and replace dirty cloths or water.
4. Clean details without damaging new finishes
Check care instructions before wiping painted walls, cabinetry, stone or wood. Use only the moisture level, cleaner and tools the manufacturer permits.
Ask the installer to deal with paint splatter or adhesive residue on new surfaces. Avoid experimenting with solvents, blades or abrasive pads.
Clean food-preparation surfaces and cabinet interiors before returning dishes and groceries. Keep cleaning products away from exposed food, and follow any label instructions for rinsing food-contact surfaces.
5. Finish floors and affected fabrics
After overhead surfaces, vacuum edges and floors with suitable equipment. Damp-mop compatible hard flooring according to its care instructions, keeping excess water away from moisture-sensitive materials.
For routine dust on curtains, removable covers and bedding, follow their laundering labels. Check upholstery instructions before vacuuming or wet cleaning, and use a suitable professional service for items you cannot clean safely.
Do not shake dusty fabrics through occupied rooms. Ask a specialist about textiles that may carry hazardous contamination before handling or washing them.
6. Check filters and inspect the result
Ask whether the work warrants an HVAC filter change and whether the system needs inspection. Use the filter specification your equipment supports. [15]
During the final walkthrough, inspect window tracks, drawer interiors, door tops and rooms along the work route. Photograph missed areas and agree on who will return to clean them.
A cloth check can reveal surface residue. It cannot test airborne hazards or replace professional clearance where the project requires it.
Your renovation dust-control checklist
Before approving the plan, check these decisions with your contractor:
· Have we identified suspect materials and agreed on assessment where needed?
· Do we know which rooms will remain usable?
· Have we chosen routes for workers, waste and household access?
· Have we protected food, belongings and personal-care items?
· Have we agreed on dust capture, barriers and equipment responsibility?
· Have we addressed HVAC operation and ventilation?
· Have we discussed allergies, asthma and time away from home?
· Does the quote define daily cleanup, waste removal and final cleaning?
· Do we have a contact for escaped dust or an unexpected material?
· Have we agreed on the walkthrough and follow-up process?
Keep the answers with your renovation agreement so you can refer to them during the work.
Frequently asked questions
How long does renovation dust take to settle?
There is no single waiting time that confirms safe re-entry. Particle size, airflow, ongoing work and cleaning affect what remains; use the project’s cleanup and assessment plan rather than a fixed countdown. [3]
Why does dust keep coming back after cleaning?
Remaining dust, ongoing work or movement from another area may explain it. Ask your contractor to check overlooked surfaces and dust routes; if registers visibly release particles, arrange an HVAC assessment. [15]
Do I need duct cleaning after every renovation?
No. The U.S. EPA recommends duct cleaning when conditions warrant it, rather than routinely; substantial debris, visible particle release or other contamination concerns justify professional assessment. [15]
Can an air purifier replace dust barriers?
No, an air purifier treats air that passes through it; dust barriers and source capture address other routes of exposure. Choose filtration as part of the overall plan. [3]
Do I need to disinfect the whole house?
Routine renovation dust removal calls for cleaning. Disinfectants address germs and do not replace physical dust removal; follow normal household hygiene needs without adding whole-home fogging or ozone treatments. [12]
When should I hire a professional cleaner?
Consider one when dust has spread widely, surfaces need specialist care, or you cannot manage the equipment or access safely. Tell the provider what work occurred; ordinary cleaning services do not automatically cover asbestos, lead or other hazardous contamination.
Planning a renovation in Waterloo Region or Guelph? Contact PD Renovations to discuss your project, household needs and dust-management expectations before work begins.
Sources
1. Health Canada: Chemical safety for renovations and DIY projects.
2. Canadian Centre for Occupational Health and Safety: Silicosis.
3. Health Canada: Fine particulate matter.
4. Health Canada: Asbestos and your health.
5. Health Canada: Lead-based paint.
7. U.S. Environmental Protection Agency: Indoor air quality when remodelling.
8. Health Canada: Residential fine particulate matter guidance.
9. Canadian Centre for Occupational Health and Safety: Workplace housekeeping.
10. Asthma Canada: Asthma triggers.
11. Asthma Canada: Guide for reducing allergens and irritants in the home.
12. Health Canada: Improve indoor air quality in your home.
13. U.S. Environmental Protection Agency: What to look for in a HEPA vacuum.
14. U.S. Centers for Disease Control and Prevention: Environmental cleaning procedures. Used for the general high-to-low cleaning sequence.
15. U.S. Environmental Protection Agency: Should you have your air ducts cleaned?.
Canadian occupational sources and U.S. sources inform technical explanations. Their workplace or jurisdiction-specific rules are not presented as requirements for every Canadian home.